
The apartment’s cleaning manager needed a suitable place to live. The choice fell on placing the robot vacuum cleaner «Britt», under the stove in the kitchen. Out of sight, out of mind.
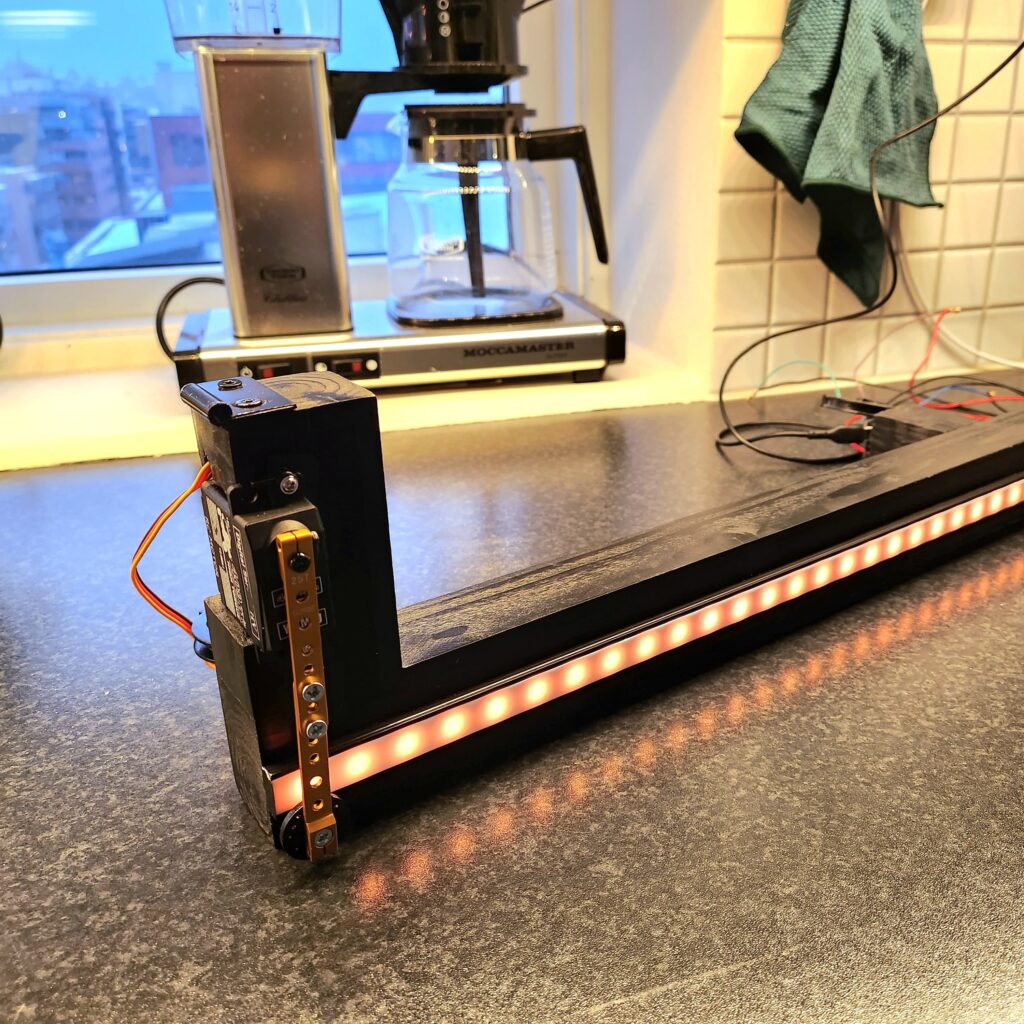
This was solved with two digital servos to lift the gate, some wood to form a frame for the gate and servos, no less than four LED strips with individually addressable LED’s to make it homey, and an ESP32 micro controller integrated into the Home Assistant to controll it all.
Features
- Cleaning per room, area or the entire apartment should be able to be ordered from the kitchen screen or from the mobile app with the Home Assistant dashboard.
- The gate must open and close automatically in all scenarios. It should not be left open while the robot vacuum is outside.
- Before cleaning is ordered, there should be a visual indicator of how much water is left in the water tank and how much dust is in the dust bin.
- The door should close as soon as the robot vacuum is back in the docking station.
- Cleaning the entire apartment should go automatically when there is no one at home. If someone comes home while the cleaning is in progress, it must be possible to interrupt the cleaning and the last room cleaned must be saved so that the cleaning continues from this room the next time the apartment is empty.
- When the robot vacuum needs maintenance, it should automatically drive out and park at the kitchen counter.
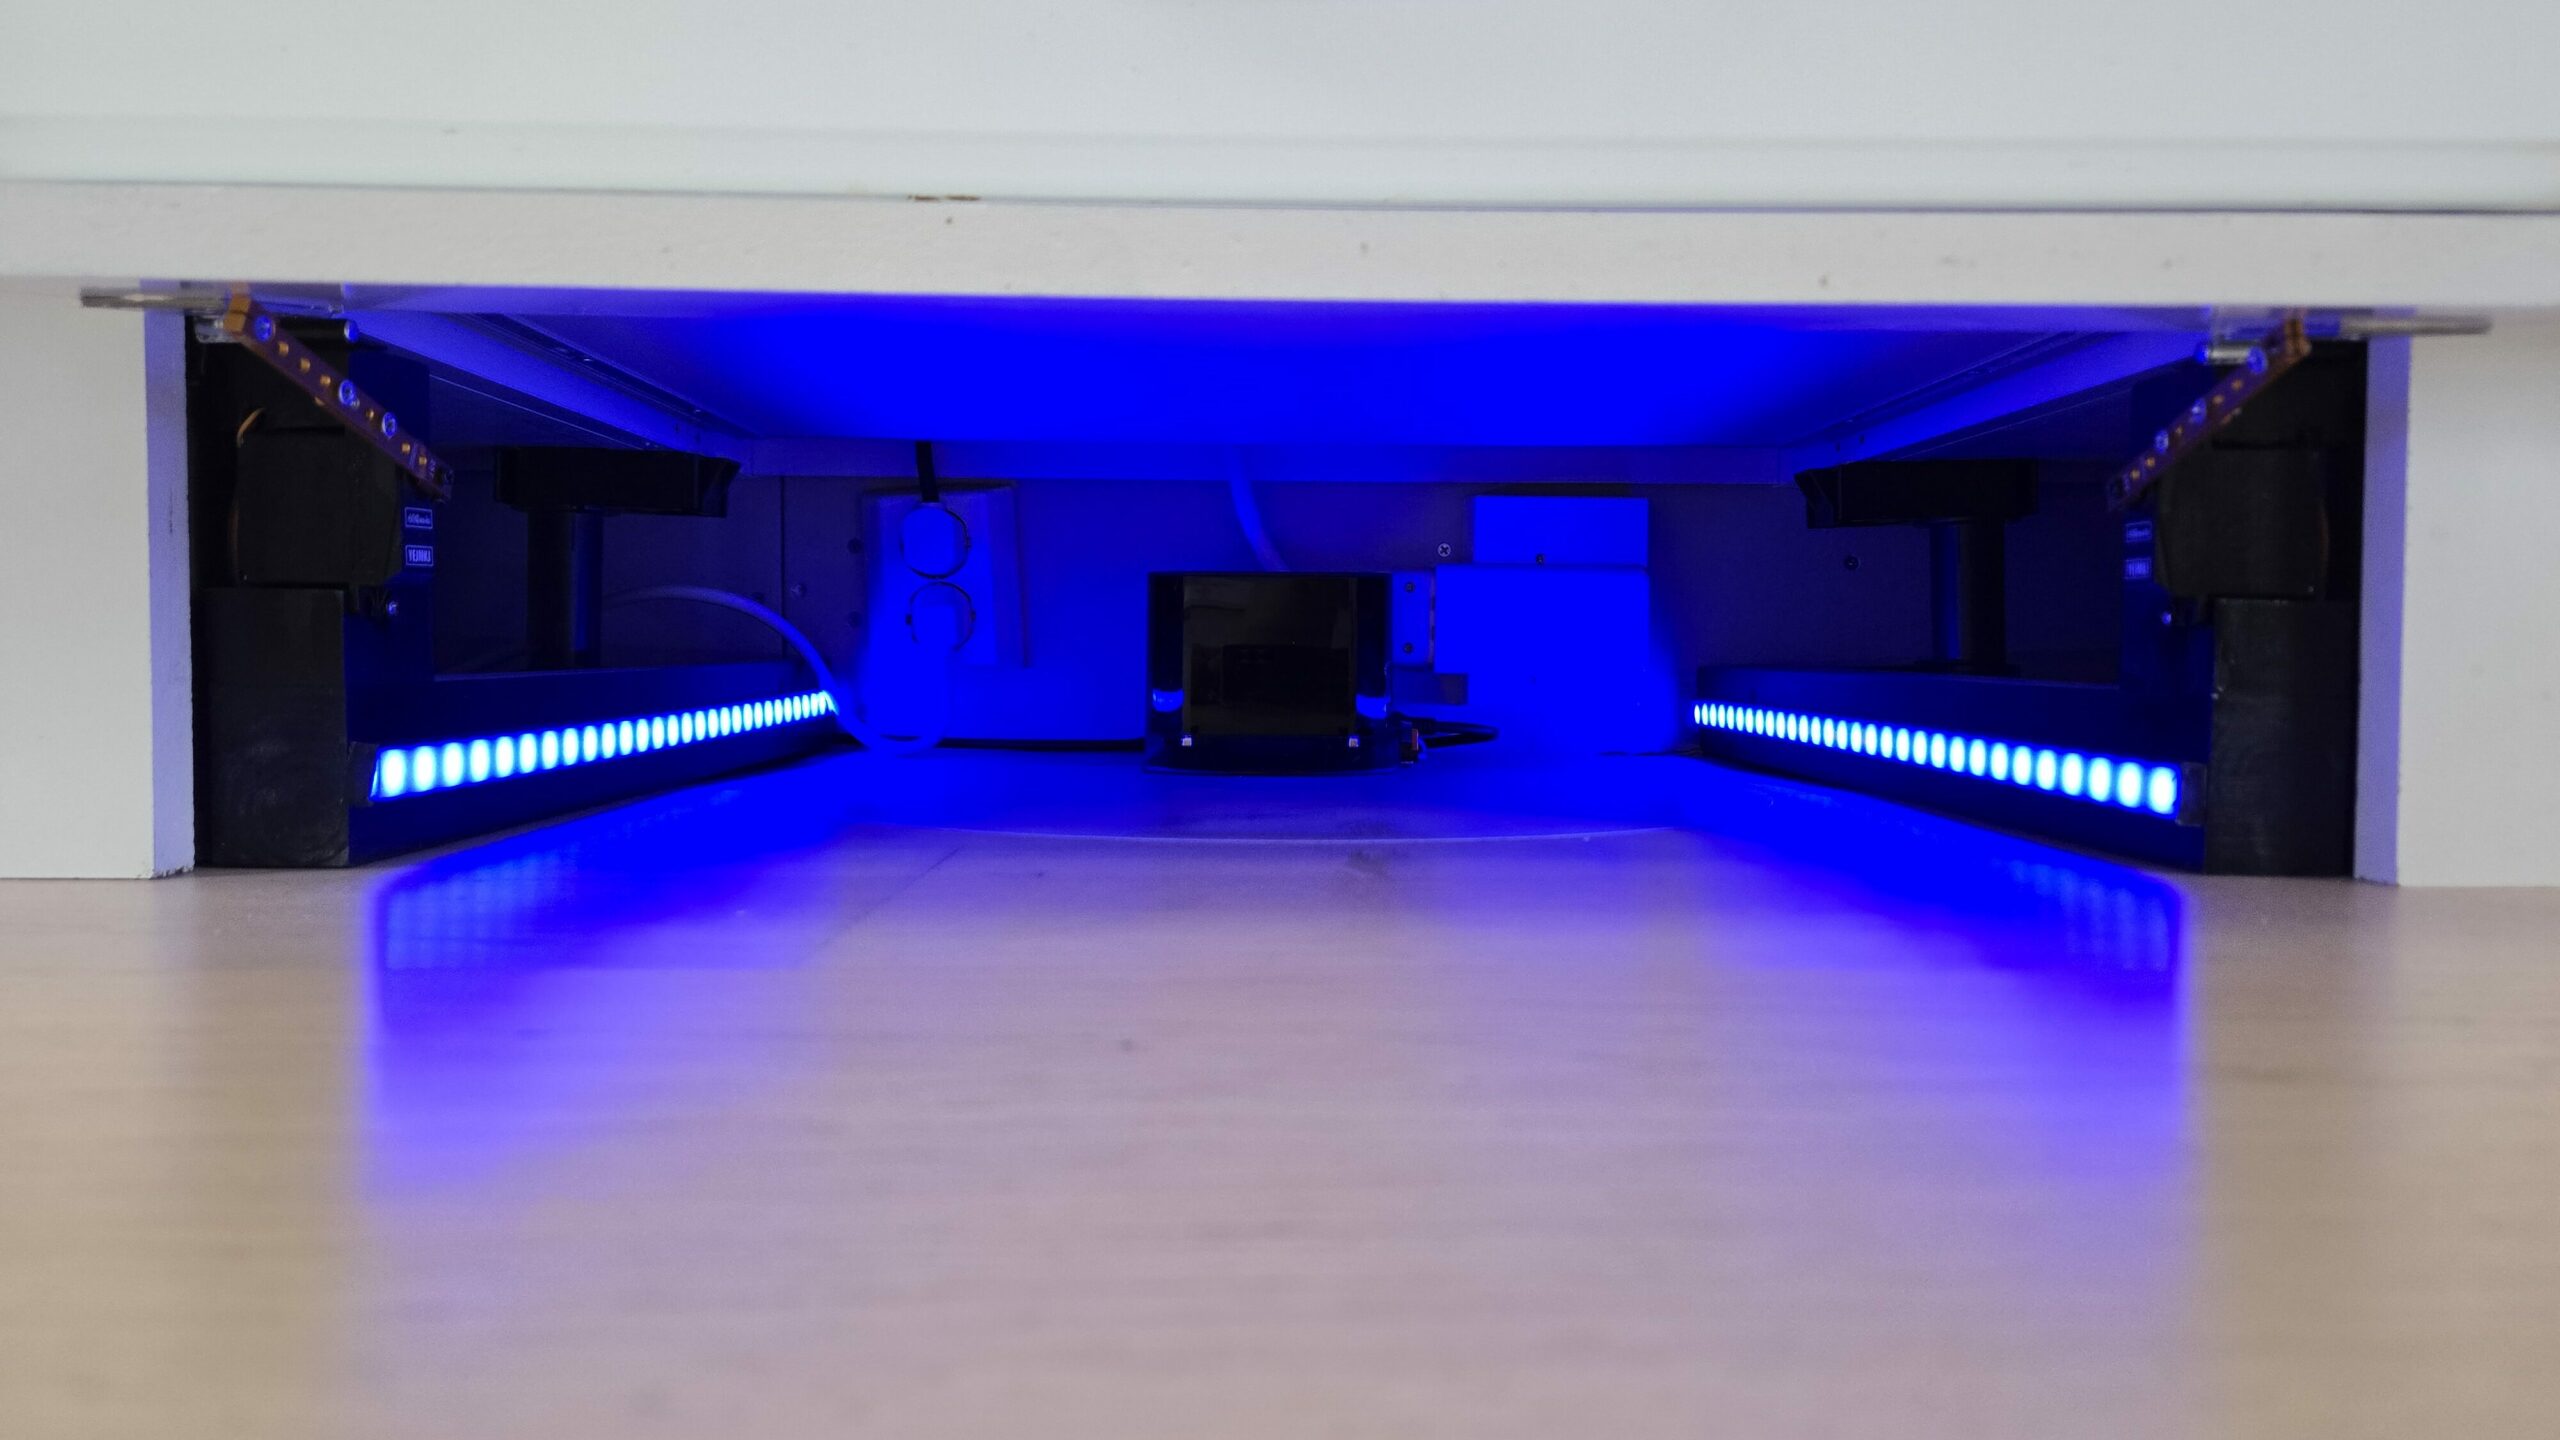
The LED strips under the cabinets serve as level indicators for the water tank and dust bin. The one on the left indicates the level in the water tank. The one on the right indicates how full the dust bin is. The LED strips lights up when the room/area selector on the kitchen screen is activated.
The color and number of lit LEDs vary based on how full the water tank and dust bin are.
If the water tank need filling, the dust bin needs emptying or other maintenance is required, the robot vacuum will automatically drive out and park in front of the kitchen counter the next time the motion sensor in the kitchen detects movement. The smart speakers announce: – «Britt requires maintenance, check the kitchen screen for details.»
A button that says what kind of maintenance is required appears on the kitchen screen, and in the mobile dashboard. When the maintenance is done and the button is pressed, the robot vacuum will return to the docking station.
When the cleaning or the maintenance is complete, the gate automatically opens to let the robot vacuum inside, and as soon as the robot vacuum is parked in the docking station, the gate closes.
The build
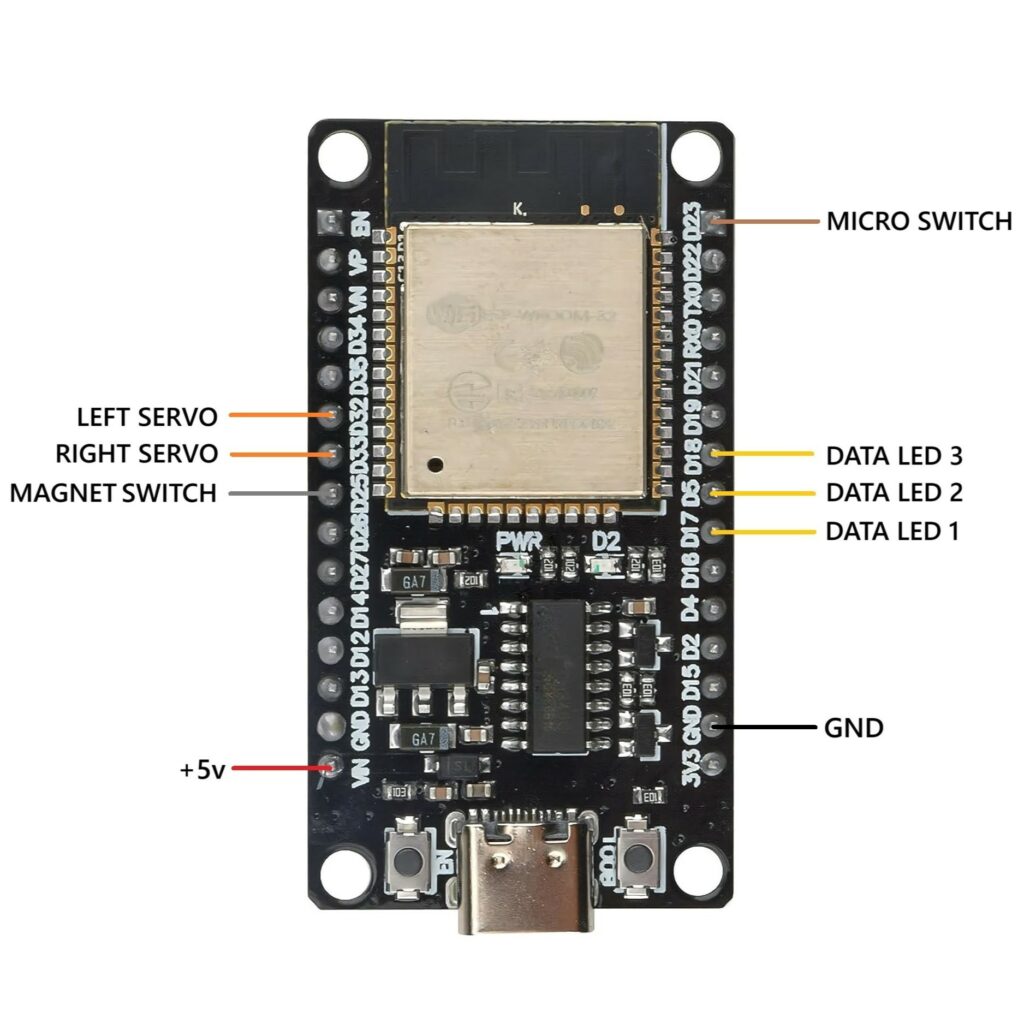
Home Assistant is a prerequisite for everything to work. The garage is controlled by an ESP32 with ESPHome installed. This is coded for the following:
- 2 PWM-signals for controlling the servos
- 3 LED controllers (fastled_clockless the platform), two of which also have LED partitioning enabled
- 1 magnet switch
- 1 micro switch
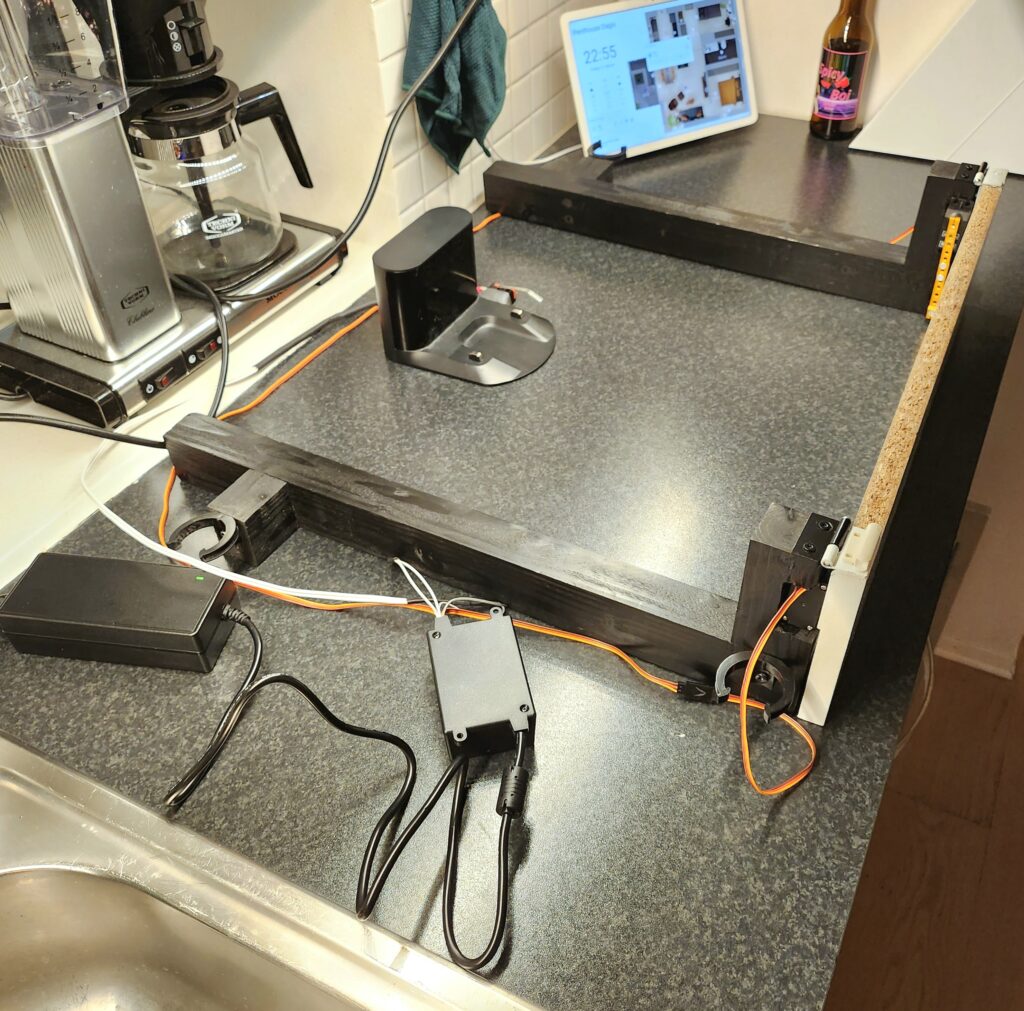
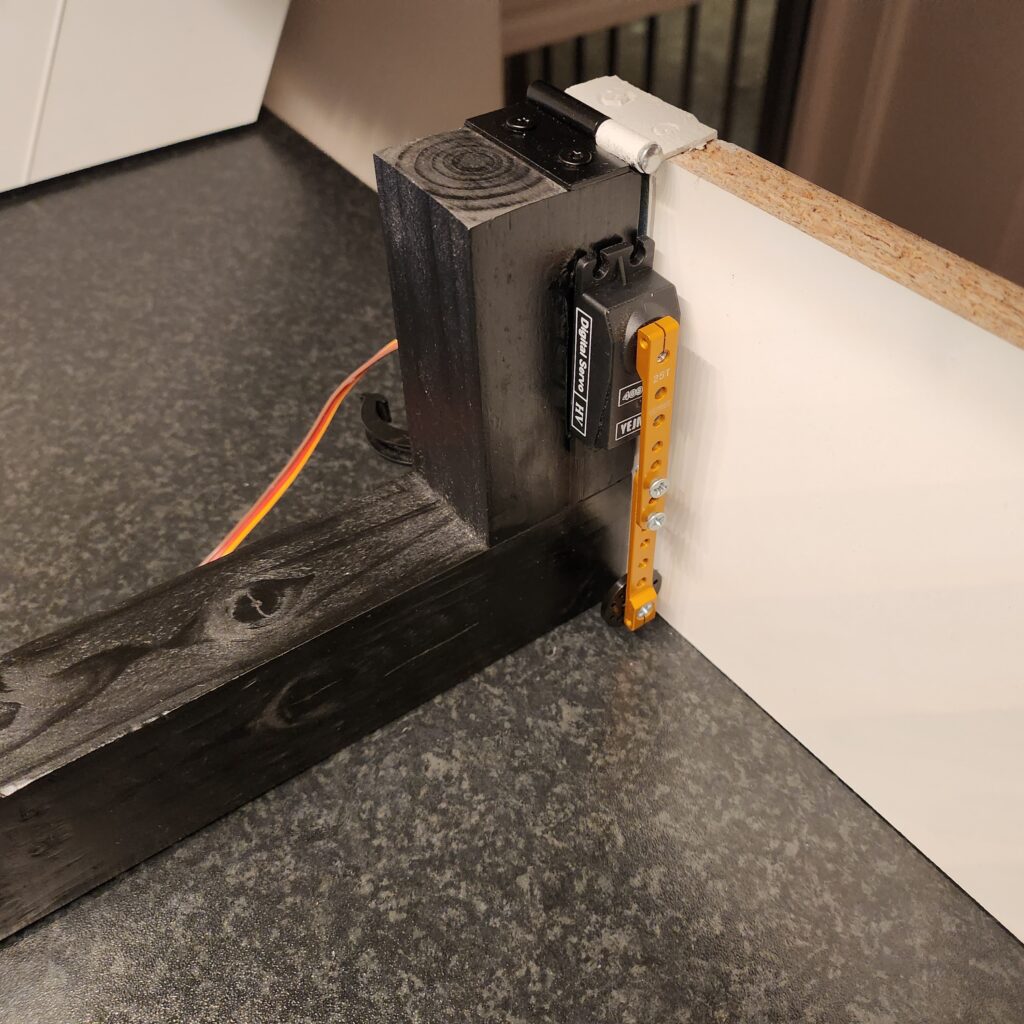
The gate is hinged at the top against two wooden frames. These frames click into place onto the legs of the kitchen counter. The servos are also mounted in these frames. The hinges are cut to get the right width and to release the hinge pin so that it can be pulled out and inserted after assembly. The gate is lifted by the servo arms. When the servos lower the arms again, gravity ensures that the gate closes.
A magnet swtitch mounted on the top of the gate notifies Home Assistant whether the gate is open or closed. A micro switch mounted on the docking station lets you know whether the robot vacuum is docked or not.
Home Assistant knows the status of the robot vacuum. That is, if it has the status «docked», «cleaning», «error», «returns to the dock» etc. through the Xioami integration. One issue with this status is that it can take up to 30-40 seconds for Home Assistant to get it from the robot vacuum. This status therefore cannot be used as a trigger for all of the gate opening/closing use cases.
Originally, the idea was to use the micro switch on the docking station to open the gate when the robot vacuum backed out of the garage, but since the distance between the robot vacuum and the inside of the gate is only 5-10 cm, the contact switch does not work for this either. The robot vacuum ended up trying to push open the gate before the servos had time to lift it.
All cleaning is done based on their own scripts in Home Assistant, and the first action in these scripts are to open the gate followed by a delay, before starting the cleaning. This solved the problem with opening the gate before the robot vacuum backs out.
Home Assistant listens to the status of the robot vacuum and opens the gate as soon as the status is reported as «returning to the dock», but here, as mentioned, there is a delay of up to 30-40 seconds. For cleaning the kitchen or other areas near the garage, the gate opens again automatically after a certain amount of time after the robot vacuum has left the dock, as part of the script. This ensures that the gate isn’t closed when the robot vacuum returns. For rooms and areas further away, where it takes the robot vacuum longer to return from, the status coming from the robot vacuum via the Xioami integration is used. If cleaning is interrupted manually with the controls in the Home Assistant, this is immediately detected and the gate opens.
The two LED strips inside the garage are connected to the same data signal. The two under the kitchen cabinets have separate data signals and are also set up with LED partitioning so that only parts of the LED strips can be lit up in the correct colors; green, yellow, and red based on the level of the water tank and how full the dust bin is.
When it comes to the actual connection of the ESP32, it will vary depending on the type of developer board used.
See the diagram for how the ESP32 used in this project is wired. A link to the ESPHome code used, as well as a link to where this ESP32 developer board can be purchased can be found further down the page.
The other wire on the magnetic sensor and contact switch connect to ground. The LED strips have three wires; data, +5v and ground. So does the servos.
Note: The components used here are chosen in part because they all run on 5 volts, same as the ESP32, this eliminates the need for converters or separate power supplies for ESP32 and LED strips/servos.

Links to components
By shopping from these links, HELLE TEC earns a small commission as a member of the Amazon Affiliate Program. The links below are for Amazon Marketplace US. They can redirect you to Amazon Marketplace in other countries, if you live in one country with Amazon locally and Amazon thinks they have a local product that is similar to the original product. In that case, make sure that the specifications are similar to the products I have linked to.
These components were suitable for the project above. They may not be suitable for your project, so make your own assessments.
- ESP32S, Dual Core, USB-C – https://amzn.to/4l8FWIE
- 5 meter WS2812B RGB LED strip with 60 LED/m – https://amzn.to/3FVFhvj
- 2 Digital servos 4.8 – 6 volt, max 25 kg torque, 180 degree rotation – https://amzn.to/4e32etf Note: the servos used in this project has been dicontinued. They have a max tourque of 11 kg each. The servos in the link should have more than enough tourque, even when running on 5 volts.
- 5 volt, 15 amp power supply- https://amzn.to/3ZxGy2k Note: this one has a US power plug so you will need a standard C13 power cabel in addition to this, if you are in Europe. Alternatively find a similar power supply with the correct plug somewhere else.
- Micro switch – https://amzn.to/3HFF3sJ
- Magnet switch – https://amzn.to/43KuMUN
- 4 pack servo arms in aluminium – https://amzn.to/4l53f62
- 5 pack LED channel – https://amzn.to/408kqeZ
- 10 meter, 3 pin LED cable – https://amzn.to/4lt1Pmr
- Glass fuse 32 mm, 5 amps, slow – https://amzn.to/43MYvfL Note: If using more LEDs or more powerful servos, use a larger fuse. With a 15-amp power supply, there is a good margin for increasing the current. In the project above, a total of just under 2 meters of LED strip is used, with 102 active LEDs.
- Fuse holder for 32 mm glass fuse – https://amzn.to/3I2ogjy
- Servo extension cables – https://amzn.to/3ZwKyQH
- Dupont cables – https://amzn.to/4l2RsoR
- Sugru (moldable glue to attach the contact switch to the docking station) – https://amzn.to/4l7s1mg
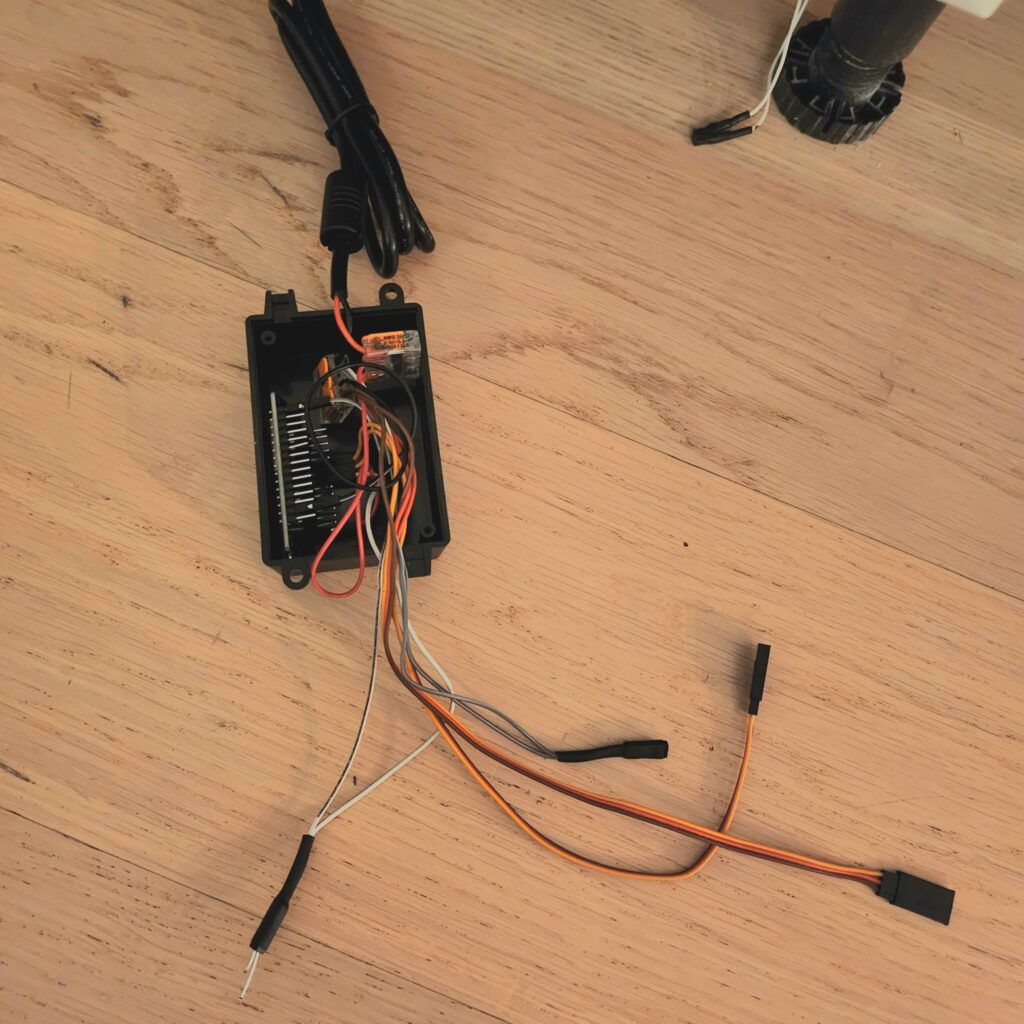
- Electronics enclosure 100x68x50mm – https://amzn.to/3ZwcCnb
Remaining parts such as hinges, mounting screws, wood, heat shrink tubing, Wago connectors, etc. can be purchased at your local hardware/electronics store.
ESP32 code
If you use this, remember to change the GPIO numbers to the correct pins for your connection and the number of LEDs to the correct number for your LED strips.
Click here (opens in new tab)